
Filters should be disinfected or sanitized at the same time as the process system in which they are installed. Filters previously used should be rinsed and cleaned before sanitization or sterilization to ensure the effectiveness of the process.
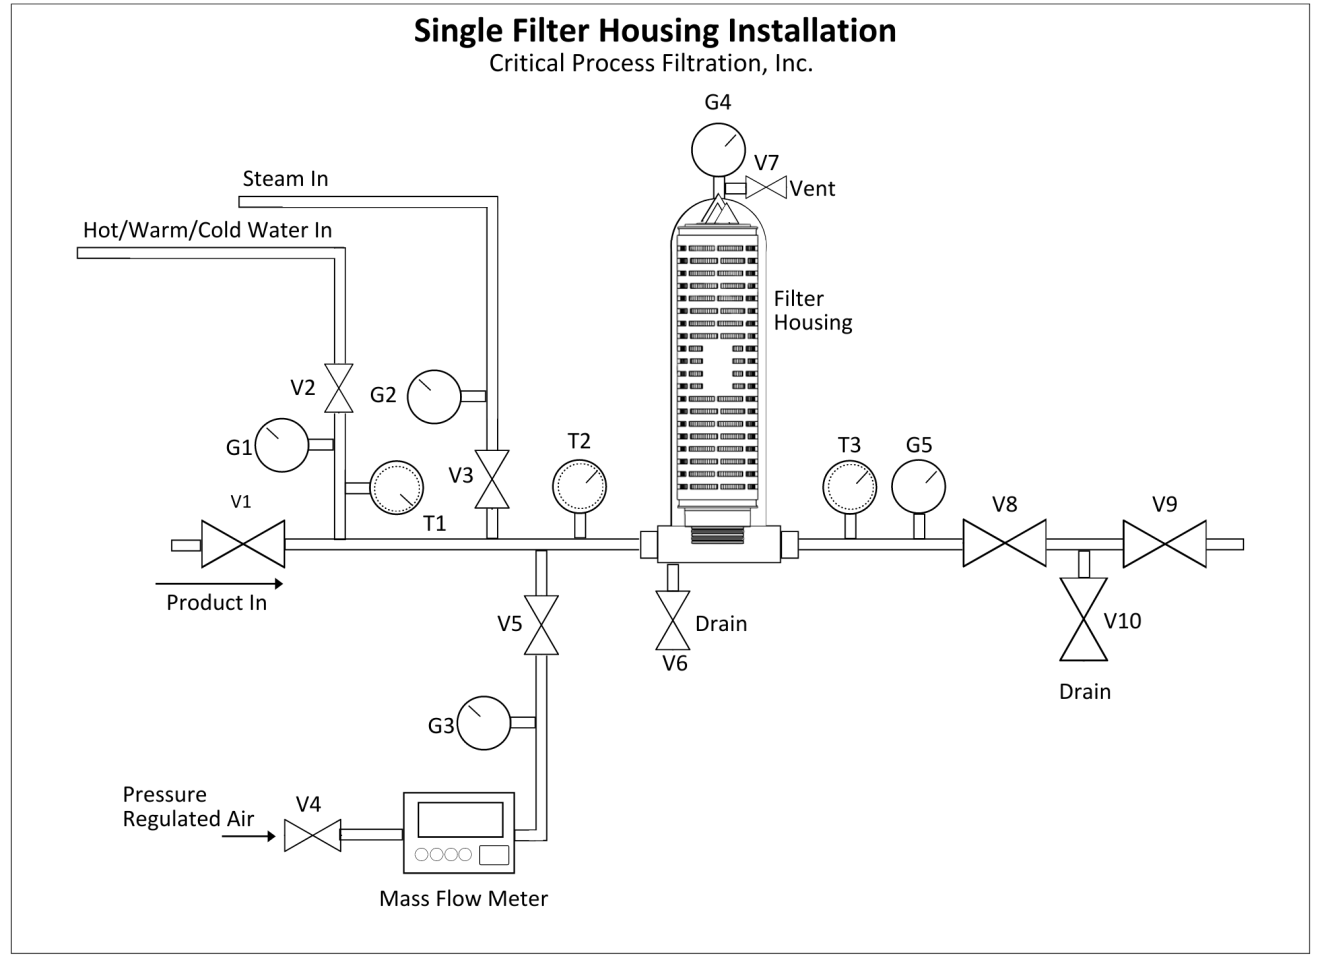
The schematic below represents a housing installation with all of the piping, valves, gauges and temperature sensors needed to effectively clean, rinse and sanitize/sterilize filters in place.
NOTE: While the schematic and filter installation instructions outlined below are specific to single filter housings, the same connections, valves and gauges also apply to multi-filter housings. Filter installation steps will be the same for each position in the housing. Multi-filter housings typically have an opening at the top rather than the housing bowl described below. Contact CPF Customer Service for additional details on multi-filter housing installation
Filter Rinsing & Cleaning Prior to Sanitization & Sterilization
To begin, use filtered water to avoid introducing particles that might clog the filter being rinsed.
If the filter is used in an application to remove undissolved particles, then rinse with cold water followed by warm water [50 ± 5 °C (113-131 °F)] to remove the soluble particles held by the filter. (NOTE: exposing filters clogged with organic residue to high-temperature sanitization or sterilization with hot water or steam without rinsing and cleaning may cause the organic material to irreversibly bond to the filter media surface and prematurely foul the filter.)
Monitoring process operations and cleaning/ sanitizing processes is critical. Pressure gauges G4 and G5 should be in place to monitor pressure during all procedures. Temperature gauges or sensors, especially at T2 and T3, should be in place to monitor cleaning and sanitization/sterilization to assure that proper temperatures are maintained.
Rinsing & Cleaning Procedure
Start with the valves closed.
- Open valves V7, V6, V8 and V10 to drain the filter system of product.
- Close all valves except V7 (vent) and leave V6 (drain) partially open.
- Open valve V2 and rinse the filter assembly with cold water.
- When the filter housing is full (no air bubbles in the flow from V7), open V8 and V10 and partially close the vent valve V7 to continue flushing the top of the filter module. (NOTE: A steady stream of water should flow from valve V7. If not, increase the water flow rate or partially close V6, V8 and V10.)
- Continue until the flow from valve V10 appears clear and free of product.
- Adjust the inlet water temperature to warm [50 ± 5 °C (113 -131 °F)] and continue flushing the filter until the flow from valve V10 is clear.
PROCEDURE NOTES
- The rinse water flow rate should be at least as high as the process flow rate.
- The housing vent connection needs to be large enough to allow adequate flow to the entire filter housing, especially when using 30 or 40-inch cartridges and/or multi-round housings.
- When switching from cold to warm water or vice versa, do so slowly to avoid large and abrupt temperature changes that may cause the filter materials to deform.
- If using reverse flow to rinse or clean filters, do not exceed the filter’s specified maximum differential pressure limit for reverse flow.
With two- or three-stage filter systems, use the same procedure as above, but the system design should include a drain valve in between each filter housing to allow each housing to be flushed independently. This is critical because substances rinsed from prefilters must not flow to the downstream filters with smaller micron ratings.
Filters can also be removed and cleaned out of place (COP) with solutions compatible with the filters which will remove the contaminants captured by the filter. Some commercially available cleaning chemicals (and their manufacturers) are:
- Tergazyme™ – Enzyme Active Powdered Detergent (Alconox, Inc.)
- Minnclean® TF – Caustic Detergent (Mar Cor® Purification, Inc.)
- Triton™ X-100 - Neutral Cleaner (Dow Chemical)
Filters should be thoroughly rinsed before reinstallation to remove residual cleaning agent.
Hot Water Sanitization Procedure
NOTE: For all elevated temperature procedures, a stainless-steel support ring is required.
- After rinsing, open valves V2, V7 (vent), V8 and V10. All other valves should be closed.
- Increase the water temperature to 90 °C (194 °F) at T2, for the time specified in process procedures. (Change the temperature slowly to avoid large and abrupt temperature changes that may cause the filter materials to deform.) NOTE: DO NOT EXCEED 3 psid (pressure differential across the filter or the filter structures may deform.
- Close valve V7 (vent) when flow is clear with no bubbles.
- Maintain a steady flow from the drain valve V10 and monitor temperature at both T2 and T3. Temperatures should be similar at the two sensors.
- At the end of the specified time, close valve V2, then close all other valves starting with V10 and proceeding upstream toward valve V2.
- Cool the filter assembly before any integrity testing or process filtration.
NOTE: The temperature and time used should be set by the filter user and based on industry standards or tests conducted in the actual installation. The temperature noted here is a suggestion based on its use in multiple facilities. Hot water flow rate is not critical. The temperature and time are the critical factors.
Steam Sanitization Procedure
NOTE: For all elevated temperature procedures, a stainless-steel support ring is required. Steam sterilization is recommended at the time of new equipment installation and after installation of new filter cartridges.
Steam sterilization safety procedures established in the facility must be strictly followed.
Start with the valves closed.
- Turn on the steam and blow down condensate from the steam line through condensate drain valve (not shown in the Single Filter Housing Installation Figure).
- When all condensate has been drained partially close the condensate drain valve and fully open V7 (vent) and half open V6 (drain).
- Slowly open steam valve V3. When steam is flowing continuously from vent valve V7, open valve V8 and partially open valve V10. Leave V9 closed.
- When steam flows continuously from valve V10, partially close vent valve V7 to stabilize steam pressure so that pressure is 14.5 psig (1 barg) at G5 with no more than 3.0 psid (0.2 barg) across the filter.
- Steam in this mode for the time specified in facility procedures.
- Preset the pressure (G3) of regulated air or nitrogen at 3.0 psig (0.2 barg) above the steam pressure (G2).
- Close valves V10, V8, V6 and vent valve V7.
- Immediately open valve V5.
- To start cooling, flush steam from the housing assembly by slowly opening vent valve V7 and drain valve V6.
- Slowly cool the housing assembly to ambient temperature.
- Close vent valve V7 and drain valve V6 after cooling.
- Close the air or nitrogen valve V5.
For two or three stage filter systems, follow these procedures. It may be necessary to steam sterilize each housing separately to assure that temperatures are maintained and pressure differential limits are not exceeded.
Use only dry saturated steam regulated at G2 to a maximum 19 psig (1.3 barg).
NOTE: During steaming, the differential pressure (G4 –G5) across the filter should not exceed 3.0psid (0.2 barg). The downstream pressure (G5) should not be less than 14.5 psig (1 barg) and the temperature should be at least 110 °C (230 °F) to achieve sterilization.
Rapid changes in differential pressure may damage filters.
Chemical Sanitization
The following chemicals are compatible with CPF cartridges and may be used to sanitize the filters if used according to the chemical manufacturer’s directions.
- Hydrogen Peroxide / Peracetic Acid (1:100 solution)
- Hydrogen Peroxide (10%)
- Sodium Hypochlorite (1:100 dilution – 500 to 600 ppm free chlorine) - Do not use for nylon membrane filters
- Glutaraldehyde (up to 3.4% Solution)
The diluted disinfectant solution should be pumped through the filters as part of the system disinfection or sanitization. Alternatively, the filters may be removed from the system and immersed in sanitizer solution according to the chemical manufacturer’s directions. If removing the filter for sanitization or disinfection, replace O-rings every 3 months.
Rinse filters and system thoroughly with sterile water before placing the filters and system back into service. Assure that residual sanitizer solution has been rinsed from the system through the use of test strips or other suitable method.
NOTE: As filters become fouled, the concentration of the chemical sanitizer may need to be increased as the sanitizer may be exhausted by contaminants on the filter. If using chemical sanitization for a system, sampling methods should be in place to assure effective sanitization.
Use sterile gloves when handling chemicals and/or filters during the sanitizing and disinfection process.
Consult the Material Safety Data Sheet for each chemical before use. Make sure the system is free from other chemicals that may react with the chosen solution before beginning the sanitization process.
Filter Storage
To store filters between uses, immerse them in a biocidal or biostatic solution such as those listed below.
- Sodium Hydroxide: Minimum .5% Concentration - Do not use for nylon membrane or fiberglass media filters
- Citric Acid: Minimum 1% Concentration
- Ethanol: Minimum 80% Concentration
NOTE: Cartridges must be fully immersed in the cleaning or storage solution. All cartridges must be rinsed with clean water to remove either the solution residue before reuse. The above information is for guidance only and may extend the useful life of the filters.