
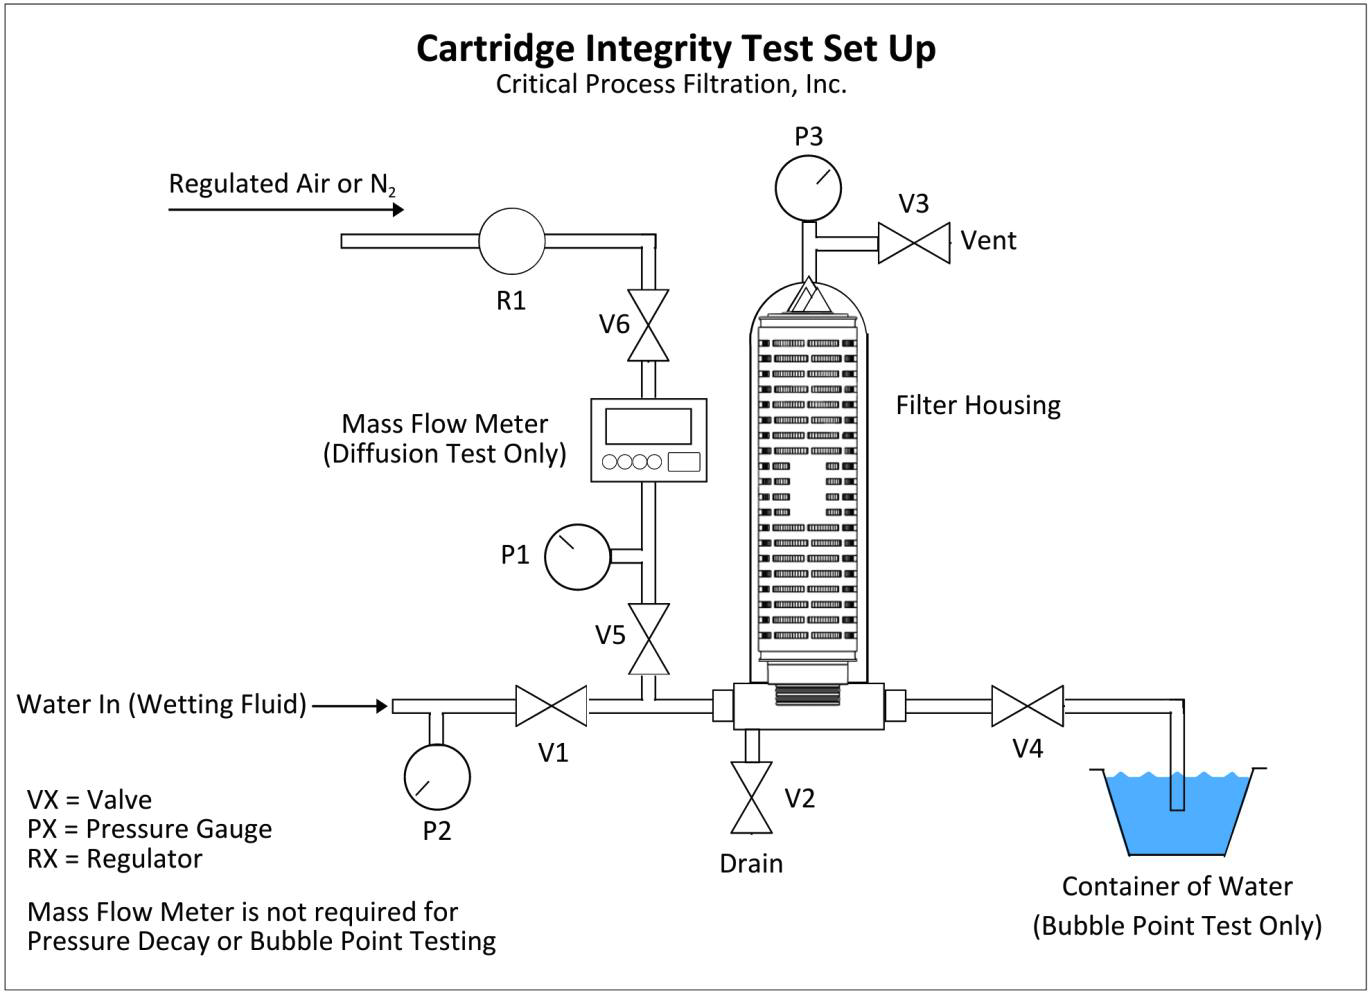
The schematic below represents a cartridge integrity test set up with all of the piping, valves, gauges and regulators needed to properly integrity test filters in place.
NOTE: Schematic shows a filter housing with a single 10” cartridge installed. Different length cartridges can be accommodated by switching out the housing bowl. Different end fittings can be accommodated with adapters.
Contact CPF Customer Service for additional details on multi-filter housing installation.
| Pore Size (µm) | Bubble Point (psi) | Pressure Decay / Diffusion Test Pressure |
| 0.03 | * | 60 |
| 0.10 | * | 48 |
| 0.22 | ≥ 50 | 35 |
| 0.45 | ≥ 25 | 20 |
| 0.65 | ≥ 19 | 15 |
| 0.80 | ≥ 15 | 12 |
* Bubble Point exceeds maximum operating parameters
Pressure Decay Test Formula
DP = D * T * Pa / V
DP = Maximum allowable Pressure Drop (starting pressure – final pressure at end of test interval)
D = Diffusion Rate limit (from cartridge data sheet)
T = Time (minutes) typically, 10 minutes
Pa = Atmospheric Pressure (14.7 psi)
V = Upstream Volume of test apparatus (cc) Can be calculated by filling the upstream side with water, then draining through V2 and measuring water volume
Diffusion specification values are shown on the Data Sheet for the cartridge being tested
Important Notes
- ALL connections must be air tight. Any leaks in the plumbing can cause inaccurate readings. It is recommended to leak-check the system on a regular basis.
- Marginal integrity failures can often be the result of inadequate cartridge wetting. As indicated in the instructions below, re-wet the module and retest.
- Gross failures could be the result of improperly installed cartridge in the housing, or a plumbing leak. Make sure the cartridge is properly installed with any O-Rings undamaged and properly seated. Check the system for air leaks.
Cartridge Installation & Wetting
- Make sure all parts required to install the cartridge in the housing are available
- Install the cartridge in the housing, ensuring all fittings and connections are tight
- If a pre-wetted cartridge is being tested, skip to the appropriate integrity test section
- To wet out a cartridge:
- Make sure all valves are closed
- Connect feed water to the “Water In” line
- Open valves V3 (Vent) and V4 (outlet)
- Slowly open V1 to allow wetting fluid to enter the housing
- Once fluid is observed coming out of the vent with no bubbles, close V3
- Adjust V1 as necessary to feed ~2 liters per minute per 10” length
- Allow fluid to flow for ten (10) minutes
- Slowly close V4 until inlet pressure (P2) reads 15 – 20 psi
- Allow fluid to flow for an additional five (5) minutes
- Close V1 k. Open V2 and V3 to allow housing to drain
Bubble Point Test Procedure
- Install cartridge into housing
- Follow wetting instructions if necessary
- Start with all valves closed
- Connect regulated air or nitrogen line to V6
- Connect flexible tubing to V4 and run the other end to a container of water
- Open valves V2 (Drain), V3 (Vent) and V4 (outlet)
- Set pressure regulator to 2 psi
- Open V5, then V6
- Allow system to purge any upstream fluid
- When flow from Vent and Drain is mostly air, close V2 and V3
- Increase pressure in 2 psi increments, holding for at least 5 seconds each time (pressure reading on P3)
- Bubble Point pressure is determined by:
- A significant increase in mass flow reading (if present)
- A steady stream of bubble from V4 tubing into the water container
- Relieve pressure at the regulator
- Close valves V6 and V5
- Open valve V3 to completely relieve upstream pressure
- Remove cartridge from housing
NOTE: If the cartridge appears to fail the initial bubble point test, repeat the Cartridge Wetting procedure and increase the rinse time to twice the initial amount to assure that the media has been properly wetted. Then, retest. If necessary, check the cartridge seal in the housing.
Pressure Decay Test Procedure
- Install cartridge into housing
- Follow wetting instructions if necessary
- Start with all valves closed
- Connect regulated air or nitrogen line to V6
- Open valves V2 (Drain), V3 (Vent), and V4 (outlet)
- Set pressure regulator to 2 psi
- Open V6, then V5
- Allow system to purge any upstream fluid
- When flow from Vent and Drain is mostly air, close V2 and V3
- Slowly increase the air pressure (pressure reading on P3) to value specified in table
- Close valve V5 a. Allow system to stabilize for 2 minutes b. Re-pressurize if necessary by opening V5
- Read pressure on P3 at end of test time (typically 10 minutes)
- Cartridge passes integrity test when the pressure drop is less than the calculated amount
- Relieve pressure at the regulator
- Close valves V6 and V5
- Open valve V3 to completely relieve upstream pressure
If the cartridge appears to fail the initial test, repeat the Cartridge Wetting procedure and increase the rinse time to twice the initial amount to assure that the media has been properly wetted. Then, retest. If necessary, check the cartridge seal in the housing.
Diffusion Flow Test Procedure
- 1. Install cartridge into housing
- Follow wetting instructions if necessary
- Start with all valves closed
- Connect regulated air or nitrogen line to V6
- Open valves V2 (Drain), V3 (Vent), and V4 (outlet)
- Set pressure regulator to 2 psi
- Open V6, then V5
- Allow system to purge any upstream fluid
- When flow from Vent and Drain is mostly air, close V2 and V3
- Slowly increase the air pressure (pressure reading on P3) to value specified in table
- Allow the system to equilibrate
- Adjust pressure regulator as necessary to maintain test pressure at P3
- Allow the mass flow meter reading to stabilize
- Cartridge passes integrity test when the diffusive flow meets the specification listed on the data sheet
- Relieve pressure at the regulator
- Close valves V6 and V5
- Open valve V3 to completely relieve upstream pressure
- Remove cartridge from housing